FFmpeg收获总结(二)--FFmpeg视频解码

FFmpeg收获总结(二)--FFmpeg视频解码
文章分为以下几个部分:
1.FFmpeg使用环境的搭建
2.认识FFmpeg中几个重要的结构体
3.FFmpeg解码的流程
4.代码示例
FFmpeg使用环境的搭建
1.首先需要把FFmpeg的组件下载下来,可以通过这个链接进行下载:
http://ffmpeg.zeranoe.com/builds/
2.打开链接之后有3个版本,只需要下载其中两个:Dev版本和Shared版本。Dev版本需要用到include目录和lib目录,里面包含了ffmpeg的xxx.h头文件以及xxx.lib库文件,Shared版本,需要用到里面的bin目录,里面包含了ffmpeg的dll文件。
3.添加到项目中。
VS中直接把这三个目录拷贝到项目下就行了。
QT里面需要把bin目录的文件放到程序生成目录下,include目录和lib目录放到代码目录下,然后在.pro文件中添加:
INCLUDEPATH += $$PWD/ffmpeg/include \

                $$PWD/src

LIBS += $$PWD/ffmpeg/lib/avcodec.lib \

        $$PWD/ffmpeg/lib/avdevice.lib \

        $$PWD/ffmpeg/lib/avfilter.lib \

        $$PWD/ffmpeg/lib/avformat.lib \

        $$PWD/ffmpeg/lib/avutil.lib \

        $$PWD/ffmpeg/lib/postproc.lib \

        $$PWD/ffmpeg/lib/swresample.lib \

        $$PWD/ffmpeg/lib/swscale.lib
认识FFmpeg中几个重要的结构体
1.AVFormatContext:包含了封装格式的数据。
2.AVStream:由AVFormatContext解封装得到的码流数据。
3.AVPacket:存储压缩编码数据相关信息的结构体。
4.AVCodecContext:码流数据的解码方式相关数据。
5.AVCodec:AVCodecContext中所包含的解码器信息。
6.AVIOContext:用来管理输入输出数据。
7.AVFrame:最终解码得到的原始数据。
FFmpeg解码的流程
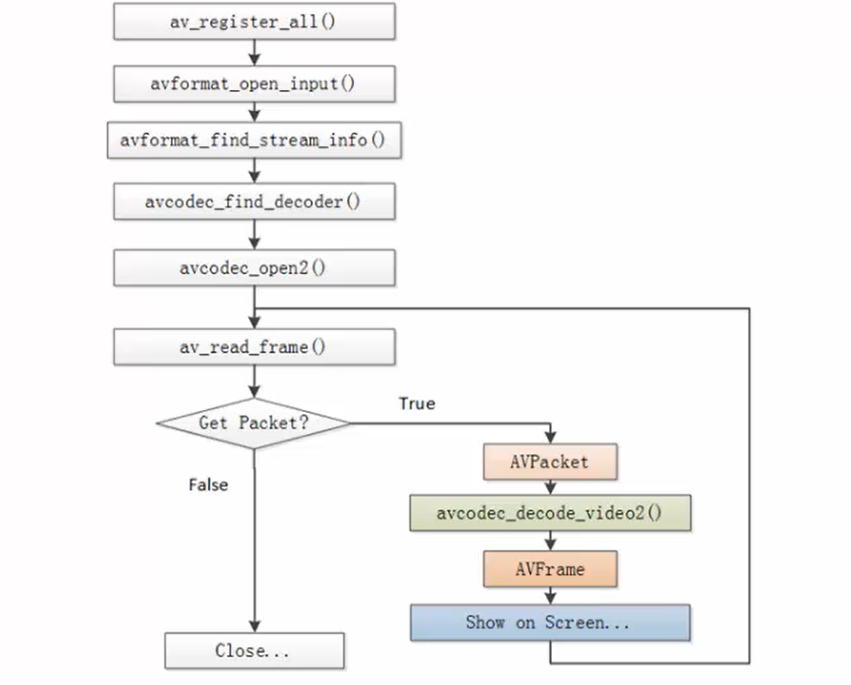
1.av_register_all():刚开始必须要做的,注册所有组件。
2.avformat_open_input():打开视频文件。
3.avformat_find_stream_info():获取视频文件信息(多宽、多高、解码器是什么类型等)。
4.avcodec_find_decoder():找出它的解码器。
5.avcodec_open2():打开解码器。
6.av_read_frame():读取一帧(读的是压缩的数据,H.264码流)
这个时候如果没有读取到数据证明视频播放完了,如果读取到了数据,读取到的数据就是AVPacket,这个结构体里面有关于编码的信息。
7.avcodec_decode_video2():解码。
解码之后得到的是AVFrame,这就是像素数据的结构体,得到它就证明解码完成了。
代码示例
main.cpp
extern "C"
{
    #include "libavcodec/avcodec.h"
    #include "libavformat/avformat.h"
    #include "libavutil/pixfmt.h"
    #include "libswscale/swscale.h"
}
#include <stdio.h>
//把RGB信息定稿到一个PPM格式的文件中。
void SaveFrame(AVFrame *pFrame, int width, int height,int index)
{
  FILE *pFile;
  char szFilename[32];
  int  y;
  // Open file
  sprintf(szFilename, "frame%d.bmp", index);
  pFile=fopen(szFilename, "wb");
  if(pFile==NULL)
    return;
  // Write header
  fprintf(pFile, "P6\n%d %d\n255\n", width, height);
  // Write pixel data
  for(y=0; y<height; y++)
  {
    fwrite(pFrame->data[0]+y*pFrame->linesize[0], 1, width*3, pFile);
  }
  // Close file
  fclose(pFile);
}
int main(int argc, char *argv[])
{
    char *file_path = "E:\\1.mp4";
    AVFormatContext *pFormatCtx;
    AVCodecContext *pCodecCtx;
    AVCodec *pCodec;
    AVFrame *pFrame, *pFrameRGB;
    AVPacket *packet;
    uint8_t *out_buffer;
    static struct SwsContext *img_convert_ctx;
    int videoStream, i, numBytes;
    int ret, got_picture;

    av_register_all(); //初始化FFMPEG  调用了这个才能正常适用编码器和解码器

    //Allocate an AVFormatContext.
    pFormatCtx = avformat_alloc_context();
    if (avformat_open_input(&pFormatCtx, file_path, NULL, NULL) != 0) {
        printf("can't open the file. \n");
        return -1;
    }
    if (avformat_find_stream_info(pFormatCtx, NULL) < 0) {
        printf("Could't find stream infomation.\n");
        return -1;
    }
    videoStream = -1;
    ///循环查找视频中包含的流信息,直到找到视频类型的流
    ///便将其记录下来 保存到videoStream变量中
    ///这里我们现在只处理视频流  音频流先不管他
    for (i = 0; i < pFormatCtx->nb_streams; i++) {
        if (pFormatCtx->streams[i]->codec->codec_type == AVMEDIA_TYPE_VIDEO) {
            videoStream = i;
        }
    }
    ///如果videoStream为-1 说明没有找到视频流
    if (videoStream == -1) {
        printf("Didn't find a video stream.\n");
        return -1;
    }
    ///查找解码器
    pCodecCtx = pFormatCtx->streams[videoStream]->codec;
    pCodec = avcodec_find_decoder(pCodecCtx->codec_id);
    if (pCodec == NULL) {
        printf("Codec not found.\n");
        return -1;
    }
    ///打开解码器
    if (avcodec_open2(pCodecCtx, pCodec, NULL) < 0) {
        printf("Could not open codec.\n");
        return -1;
    }
    pFrame = av_frame_alloc();
    pFrameRGB = av_frame_alloc();
    img_convert_ctx = sws_getContext(pCodecCtx->width, pCodecCtx->height,
            pCodecCtx->pix_fmt, pCodecCtx->width, pCodecCtx->height,
            PIX_FMT_RGB24, SWS_BICUBIC, NULL, NULL, NULL);
    numBytes = avpicture_get_size(PIX_FMT_RGB24, pCodecCtx->width,pCodecCtx->height);
    out_buffer = (uint8_t *) av_malloc(numBytes * sizeof(uint8_t));
    avpicture_fill((AVPicture *) pFrameRGB, out_buffer, PIX_FMT_RGB24,
            pCodecCtx->width, pCodecCtx->height);
    int y_size = pCodecCtx->width * pCodecCtx->height;
    packet = (AVPacket *) malloc(sizeof(AVPacket)); //分配一个packet
    av_new_packet(packet, y_size); //分配packet的数据
    av_dump_format(pFormatCtx, 0, file_path, 0); //输出视频信息
    int index = 0;
    while (1)
    {
        if (av_read_frame(pFormatCtx, packet) < 0)
        {
            break; //这里认为视频读取完了
        }
        if (packet->stream_index == videoStream) {
            ret = avcodec_decode_video2(pCodecCtx, pFrame, &got_picture,packet);
            if (ret < 0) {
                printf("decode error.\n");
                return -1;
            }
            if (got_picture) {
                sws_scale(img_convert_ctx,
                        (uint8_t const * const *) pFrame->data,
                        pFrame->linesize, 0, pCodecCtx->height, pFrameRGB->data,
                        pFrameRGB->linesize);
                SaveFrame(pFrameRGB, pCodecCtx->width,pCodecCtx->height,index++); //保存图片
                if (index > 50) return 0; //这里我们就保存50张图片
            }
        }
        av_free_packet(packet);
    }
    av_free(out_buffer);
    av_free(pFrameRGB);
    avcodec_close(pCodecCtx);
    avformat_close_input(&pFormatCtx);
    return 0;
}
我们可以看到avcodec_decode_video2()函数中第二个参数pFrame,它负责接收解码后的数据,然后下面又通过sws_scale()转换了一下,这是为了得到RGB数据,之前的文章说到过像素格式除了RGB还有YUV,这个地方也可以转换成YUV格式,具体看怎么用。
{{ cmt.username }}
{{ cmt.content }}
{{ cmt.commentDate | formatDate('YYYY.MM.DD hh:mm') }}